Wednesday, December 2, 2015

Learn How To Crochet


Learn how to crochet tutorial
Whether you’re totally new to Crochet or looking to improve your techniques you’ll love this collection of Crochet Tutorials we’ve put together for you. We’ve included a Left Handed Beginner’s Crochet Tutorial too. Be sure to scroll down the page and check them all out. Don’t forget to Pin your favourites so you don’t lose them!

Click Here to see how.

Source: moogly.com

Bell Flower Cocoons

Newborn Knitted Bell Flower Crochet Pattern

You’ll love to make one of these adorable Knitted Bell Flower Cocoons! They would make a lovely handmade gift and they’re perfect for keeping your little bundle warm and snuggly. Think of the photos you can take! We’ve included a Crochet version below too, plus the Knitted Cocoon can be purchased as a gift

Click Here for free pattern and tutorial.

Source:  etsy.com

Monday, November 2, 2015

DIY Succulent Wreath

Succulent Wreath Tutorial

Create your own Succulent Wreath for a wall or table!  They’re low maintenance plants requiring little water and brighten up any outdoor space. Be sure to scroll our post for more versions and check out the stunning Succulent Ball too.

Click Here for the pattern and tutorial.

Source:  bhg.com

Cute Crochet Projects

Animal Taggie Blankets Free Crochet

We’ve put together a selection of cute crochet projects you’ll love. These are a selection of mainly FREE but some Paid Patterns. Be sure to scroll our page and check them all out and Pin your favourites.

Click Here for the patterns and tutorials.

Source:  blog.lovecrochet.com

Crocodile Stitch Owls

Crocodile Stitch Owls Crochet Free Pattern

How cute are these little Crochet Owls! The pattern uses Crocodile Stitches and looks as if the Owl has real feathers! The Pattern is a Paid Pattern however we have included some FREE Patterns in the post so be sure to have a look.  There is also a Video Tutorial to help you on your way. Be sure to scroll our post now for lots of cute versions including a gorgeous Bag and Pin your favourites.

Click Here for the free pattern and tutorial.

Source: ravelry.com

Monday, October 5, 2015

Volkswagen Van

VW Bus Free Crochet Pattern

You’ll love to make this Crochet Volkswagen Bus and it’s a FREE Pattern! It’s fun to make and looks fantastic. The Crochet Pattern uses Amigurumi, the Japanese art combining crochet or knitting and sewing. It will make a gorgeous gift too.

Click Here for the free Volkswagen Van pattern.

Source: Van By Wilma

Thursday, October 1, 2015

Crochet 3D Roses

3D Flower Crochet Free Pattern

These Crochet 3D Flowers are pretty as a picture and perfect for adding to hats, brooches, hair clips, bags and so much more! You’ll love this FREE Pattern. Whilst the original site needed Interpreting we have Translated the Page for your ease so you can grab the Pattern in English at the link below.

Click Here for website.

Source: whoot.com

Tuesday, September 1, 2015

Dinosaur Amigurumi

Dinosaur Amigurumi by Justyna Kacprzak

Click Here to see how to make this Dinosaur.

Source: crochetenvy.com

Tuesday, June 9, 2015

The Princess Tent Or The Boy's Tent


Click Here to view the tutorial and get the list of items need to make your own child's tent.

Source: craftifyit.blogspot.com.au

Saturday, May 2, 2015

DIY Free Teddy Bear Pattern


Click Here for your free Pattern.

Source: bhookedcrochet.com

Wednesday, April 1, 2015

DIY Crocodile Stitch Owl Bag


Click Here to get the free pattern for the Crocodile Stitch Owl Bag.

Source: ravelry.com

DIY Sock Bunny, Free Pattern

How to sew sock bunny

Click Here for free pattern and tutorial to make the Sock Bunny for you children or grand children.

Source: craftpassion.com

DIY Easy Crochet Flower

Easy Crochet Flower for Web

Click Here for a Free Pattern and tutorial on how to make an Easy Crochet Flower.

Source: bhookedcrochet.com

DIY Starlight Women Slippers - Free Crochet Pattern


Click Here for the free pattern for these Starlight Women's Slippers.

Source:  myhobbyiscrochet.com

DIY 6 Petal Puff Stitch Flower


Click Here for the tutorial and pattern of the 6 Petal Puff Stitch Flower.

Source:  mamachee.com

DIY African Flower Granny Square

http://www.craftpassion.com/wp-content/uploads/2011/04/crochet-african-flower.jpg

Click Here for the free pattern to make a Granny Square for an African Flower.

Source: craftpassion.com

DIY Free Honeycomb Stroller Blanket Knitting Pattern


Click Here to get you free pattern for knitting this baby blanket.

Source: lifestyle.howstuffworks.com

Sunday, March 1, 2015

DIY Lacy Shell Stitch Shrug Crochet

shells-and-lace-shrug-pattern-crochet

Click Here for Free Pattern and list of materials needed.

Source: ashleemarie.com

DIY Crochet Cabbage Patch Doll Hair Hats


Click Here for free pattern and tutorial.

Source: repeatcrafterme.com

DIY Vintage Little Girl's Crochet Dress


Little Girl Vintage Dress 

By: AnnooCrochet Designs

Click Here for free pattern and tutorial. 

Source: annoocrochet.com

DIY Crochet Flapper Cloche Hat


free crochet cloche pattern Beverly in Vanna's Choice #cre8tioncrochet


This hat is inspired by the cloches of the 1920’s “flapper” era.  Simply stated cloche is defined as a “bell” shape.  As such, a true cloche hat will resemble a bell.  This hat is worn fitted and snug.  Most cloches were trimmed and adorned with a large flower.

Click Here to get the pattern and view the tutorial video.

Source: cre8tioncrochet.com

Monday, February 23, 2015

DIY Arm Knitted Blanket

Arm Knit a Blanket

Arm Knitting is so much fun.  It’s quick and easy and you don’t need any special skills or needles as you use your arms! You’ll love this Tutorial that shows you how to make a blanket in only 45 minutes!


Click Here for tutorial.

Source:  flaxandtwine.com

DIY 30 Minute Arm Scarf

30 Minute Arm Scarf - FREE Knitting Pattern

How would you like to be able to knit this fab scarf in 30 short minutes using your arms?


Click Here for tutorial and list of items needed to complete this project.

Source: handimania.com

DIY Arm Knit A Blanket

Arm Knit a Blanket In One Hour
Arm Knitting is so much fun.  It’s quick and easy and you don’t need any special skills or needles as you use your arms.  You will love this Tutorial that shows you how to make a blanket in only one hour.


Click Here on how to arm knit a blanket.

Source: simplymaggie.com

DIY Tricycle Diaper Cake


Click Here for tutorial and materials needed.

Source: maidendshade.com

DIY Motorcycle Diaper Cake


Click Here for instructions tutorial and items needed.

Source: sweetaprils.com

DIY Cupcake Onesies For Baby Shower

Cupcake Onesies

Click Here for tutorial and materials needed.

Source: club.chicacircle.com

DIY Washcloth Puppy


Click Here for the tutorial, instructions and material list.

Source: agirlcalledkim.blogspot.ca

DIY Diaper Cakes

http://cdn.thewhoot.com.au/wp-content/uploads/2014/05/DIY-Nappy-Cakes.jpgBath Nappy Collage
You’ll love this collection of DIY Diaper Cakes.  They make fabulous gifts and you can save money putting them together yourself!

Click Here for tutorial and instructions for the Princess Diaper Castle.

Click Here for tutorial and instructions for the Diaper Tub.

Click Here for the Wash Cloth Puppy tutorial and instructions.


Crochet Four Leaf Clover

Clovers for Web 3

Click Here for tutorial and instructions.

Source: bhookedcrochet.com

Crochet Owl Hat Pattern


Click Here for tutorial and instructions.

Source: repeatcrafterme.com

Crochet Owl Granny Square Afghan

undefined

Click Here for tutorial and instructions.

Source: onecraftshortofcrazy.blogspot.com.au

Fingerless Crochet Owl Mittens

Crochet Owl Mittens
How gorgeous are these little fingerless Crochet Owl Mittens!  They’re super easy to make, just crochet the squares and sew up the side leaving a thumb hole.

Click Here for tutorial and instructions.

Source:  thegreendragonfly.wordpress.com

Source:

Owl Granny Squares


Click Here for the tutorial and instructions.  

Source: repeatcrafterme.com

Start by making your owl. This pattern would also make a great appliqué!

Magic Ring, Chain 1, 8 HDC in magic ring, join to first HDC, chain 1
Round 2: 2 HDC in each around, join to first HDC, change color (16 HDC)
Round 3: Chain 2, 2 DC in each around, join to first DC, chain 1 (32 DC)
Round 4: HDC, in next stitch: DC - TC - DC, SC in next 5, in next stitch: DC - TC - DC, HDC in next, slip stitch to join.
fasten off, weave in ends. - See more at: http://www.repeatcrafterme.com/2012/11/owl-granny-square-crochet-pattern.html#sthash.Xio1Rv5L.dpuf

Teddy Granny Squares

20130709-124433.jpg
Round 1 .: crochet 8 dc with black in a magic ring (possibly. 3lm, set into a ring, 8 sc in ring.)

Round 2 .: Change to light brown and crochet 2 sc in each st = 16 m

Round 3 .: x 1 sc, 2 sc in next st 8 twice = 24 m

Round 4 .: x 2 sc, 2 sc in next st 8 twice = 32 m

Round 5 .: x 3 sc, 2 sc in next st 8 twice = 40 m

Round 6 .: x 4 sc, 2 sc in next st 8 twice = 48 m

7.0mg .: Now you crochet with light brown and pink. 1 dc with light brown, skip 2 sts and crochet 7 dc in next st (= first ear) .Hopp over 2 m, 1 sc in next while you switch to pink, skip 2 sts and crochet 7 dc in next . Skip 2 sts, 1 dc and switch to light brown. Crochet an ear to, skip 2 sts, 1 dc in next. Cut off the light brown thread and change to pink before crocheting further eight arches in all.
20130709-125502.jpg
Now you crochet border around the teddy bear. Follow the diagrams below from point I - III. Cut the thread and fasten!
20130709-125750.jpg
The heads can be varied so there will be other animals, for example. lion, cat, mouse, etc. You can also create tag bit smaller by cutting out the last half, or replacing st sc (then crochet 1 sc + 2lm + 1 sc in corner)!
20130710-103507.jpg

English version:
 
Round 1: With black makeover 8 sc in a magic circle. Change to brown yarn.

Round 2: 2 sc in each st = 16

Round 3: x 1 sc, 2 sc in same st x = 24

Round 4: x 2 sc, 2 sc in same st x = 32

Round 5: x 3 sc, 2 sc in same st x = 40

Round 6: x 4 sc, 2 sc in same st x = 48

Round 7 are made in two colors; bothering brown and pink. Start with 1 sc in brown, ship 2, 7 dc in next st (first ear). Ship 2, 1 sc in next - at the sametime, change two pink- ship 2, 7 dc in next st.

Ship 2, 1 sc in next st - change back to brown - ship 2, 7 dc in next st (second ear), ship 2, 1 sc in next st. 

Cut the brown yarn, and continue around in pink, making 7 dc bows = 8 in all. 1 sl st in the first sc.

For the remainder of the Teddy-square, follow the chart! ch = ch, sc = sc, hdc = hdc, dc = dc, dst = tr.

And if you wanna make other animals, just use your imagination, change the colors, and Suddenly you feb have a tiger-square

If you want a smaller square, just change dc two sc in the last round, making 1SC-2ch 1SC in the corner!

Source: bonzostrikk.wordpress.com 

Puff Stitch Fingerless Gloves


Materials:
  • 1 Skein (Approx 110 yards)
  • 5mm Crochet Hook
  • Darning Needle
  • Scissors
Pattern Abbreviations:
  • BLO – Back Loop Only
  • Ch – Chain
  • Pf – Puff Stitch
  • Sc – Single Crochet
  • Slst – Slip Stitch
  • Sts – Stitches
Instructions:

Band

Row 1: Ch 11. Sc in 2nd chain from hook and in each remaining chain. Ch 1 and turn your work.

Rows 2-30: Working in the BLO, make one sc in every stitch. Ch 1 and turn your work in between rows.

Bind off and use a darning needle to sew the two ends together.

Hand

Round 1: Bind on and ch 1. Sc in every row of single crochet from the band. Join with a slst to the ch 1. (30 sts)

Round 2: Make a Pf stitch, skip a stitch and Pf stitch into the next. Repeat around the glove and join with a slst to the first pf stitch. Don’t forget the chain 1 step at the end of each pf stitch. (15 pf sts)

Rounds 3-5: Make a pf stitch into each chain one space. Join with a slst to the first pf stitch. (15 pf sts)

Round 6 (For Right Hand Glove): Make 12 pf stitches. Ch 3 and skip one space. Make two pf stitches in the remaining spaces. Join with slst to the first pf stitch. (14 pf sts)

Round 6 (For Left Hand Glove): Make 2 pf stitches. Ch 3 and skip one space. Make 12 pf stitches in the remaining spaces. Join with slst to the first pf stitch. (14 pf sts)

Rounds 7-8: Make one pf stitch in every space, including the ch 3 space. Join with a slst to the first pf stitch. (14 pf sts)

Round 9: Ch 1. Sc into each pf stitch and chain 1 space. Join with a slst to the ch 1. (28 sts)

Bind off and weave in your ends.

Source:

The Triple Stitch Straw Hat

Image
Get ready for summer fun with this crochet straw hat pattern. Make your own crushable, easy wear sun protection, perfect for beach, swimming, and gardening! This pattern includes multiple sizes from infant through adult.

Please do not forward this pattern to someone else.  We make our living by distributing our patterns.  If someone you know wants to use the pattern, please have them join the mailing list at www.sunsetfamilyliving.com.

Click above web address to get free pattern.

Thanks again for being a part of Sunset Family Living!

Bonnie

Free Spring Crochet Hat Pattern

free crochet cloche pattern Beverly in Vanna's Choice #cre8tioncrochet

Materials:

2 colors of Vanna’s Choice Yarn in your choice of colors
5.0mm hook
Embroidery needle for weaving in ends and securing flower to hat
Spring Blossom flower applique pattern

Special Stitches:

mc- magic circle/ring (click HERE for written and video tutorial)

Notes:

I recommend using my seamless method.  My seamless methods can be found here, follow the instructions for the second method in the hdc rows and when changing colors and use the first method for the sc rows.
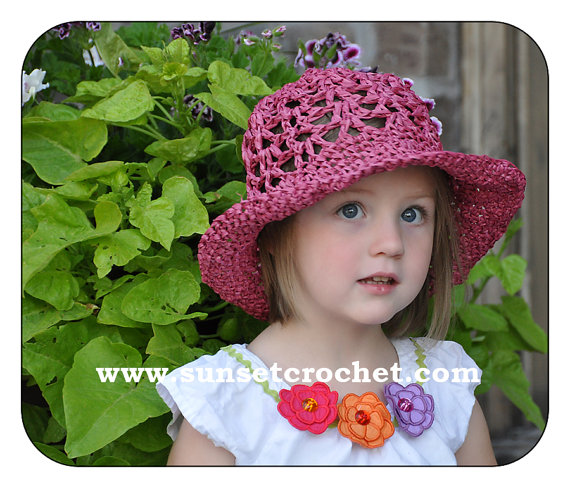
You can do the hat, border and trim in any combination of colors that you like, the hat consists of 13 rows of hdc (totaling 45hdc at 5th row) followed by 5 rows of 45sc, one more row of 45hdc followed by one row of 90dc for brim and 1 row of 90sc for trim, brim is ended in one row of 90 sl st.  Color changes can be made anywhere.  I made one of the models using two colors for the border and one using only one color, along with using trim color on one and not on the other.

Gauge:

1st round= 1 ¼”
2nd round= 2 inches (each subsequent round = 1″)
Flat circle (at the end of round 5)= 5″

Hat Pattern:

1.  MC/R with 10hdc join round with sl st
2.  2hdc in every st.  join round with sl st <20>
3. *1hdc in first st, 2hdc in next st.  Repeat from * around.  join round with sl st <30 p="">4. *1hdc in first st, 1hdc in next st.  2hdc in next st.  Repeat from * around.  join round with sl st<40>
5. *1hdc in first st, 1hdc in next st, 1hdc in next st, 2hdc in next st.  Repeat from * around.  join round with sl st <50>
6.  1hdc in every st, join round with sl st <50>
7.  1hdc in every st, join round with sl st <50>
8.  1hdc in every st, join round with sl st <50>
9.  1hdc in every st, join round with sl st <50>
10.1hdc in every st, join round with sl st <50>
11. 1hdc in every st, join round with sl st <50>
12. 1hdc in every st, join round with sl st <50>
13. 1hdc in every st, join round with sl st <50>
14. Change to border color- 1sc in every space , join round with sl st <50>
15. 1sc in every st, join round with sl st <50> (optional band color)
16. 1sc in every st, join round with sl st <50> (optional band color)
17. 1sc in every st, join round with sl st <50> (optional band color)
18. 1sc in every st, join round with sl st <50> (change back to border color)
19. Change back to hat color- 1hdc in every st, join round with sl st <50>
20. 2dc in every st, join round with sl st <100dc>
21. Change to trim color if you wish- 1sc in every st, join round with sl st <100>
22. 1sl st in every st <100> Do NOT join round with sl st… use my invisible finish to complete piece.

Source:  cre8tioncrochet.com